3D Photo Inpainting - Turn Any Picture Into 3D Photo with Deep Learning and Python
— Deep Learning, Computer Vision, Machine Learning, Neural Network, Python — 3 min read
Share
TL;DR Learn how to create a 3D photo from a regular image using Machine Learning
Have you seen those amazing 3D photos on Facebook and Instagram? How can you create your own from regular photos? We’re going to do that with the help of a project called: 3D Photography using Context-aware Layered Depth Inpainting. We’ll try out different photos, and have a look at how it all works!
Here’s what we’ll go over:
- Install the prerequisites for the 3D photo inpainting project
- Look at a demo
- Convert some images into 3D photos
- Dive deeper into how it works
- Look into what training data was used
Let’s make some 3D photos!
Prerequisites
The 3D inpainting project requires some libraries preinstalled. Let’s get those:
1!pip install -q vispy==0.6.42!pip install -q moviepy==1.0.23!pip install -q transforms3d==0.3.14!pip install -q networkx==2.3We’ll also define two helper functions that’ll help us visualize depth estimations and final results:
1from IPython.display import HTML2from base64 import b64encode34def show_inpainting(image_file, video_file):5 image_content = open(image_file, 'rb').read()6 video_content = open(video_file, 'rb').read()7 image_data = "data:image/jpg;base64," + b64encode(image_content).decode()8 video_data = "data:video/mp4;base64," + b64encode(video_content).decode()9 html = HTML(f"""10 <img height=756 src={image_data} />11 <video height=756 controls loop>12 <source src={video_data} type='video/mp4'>13 </video>14 """)15 return html1617def show_depth_estimation(image_file, depth_file):18 image_content = open(image_file, 'rb').read()19 depth_content = open(depth_file, 'rb').read()20 image_data = "data:image/jpg;base64," + b64encode(image_content).decode()21 depth_data = "data:image/png;base64," + b64encode(depth_content).decode()22 html = HTML(f"""23 <img height=756 src={image_data} />24 <img height=756 src={depth_data} />25 """)26 return htmlThe show_inpainting() function shows the inpainted video along with the original photo. show_depth_estimation() shows the estimated depth of each pixel of the image (more on that later).
Demo
Let’s see what we’re going to achieve:
1!mkdir demo2!gdown -q --id 1VDT5YhANPJczevyhTdasJO5Zexl2l_fd -O demo/dog.jpg3!gdown -q --id 1CAsRBub83ptC_zPWFRZIDQDU47tFy_ST -O demo/dog-inpainting.mp445show_inpainting('demo/dog.jpg', 'demo/dog-inpainting.mp4')Original image

3D photo
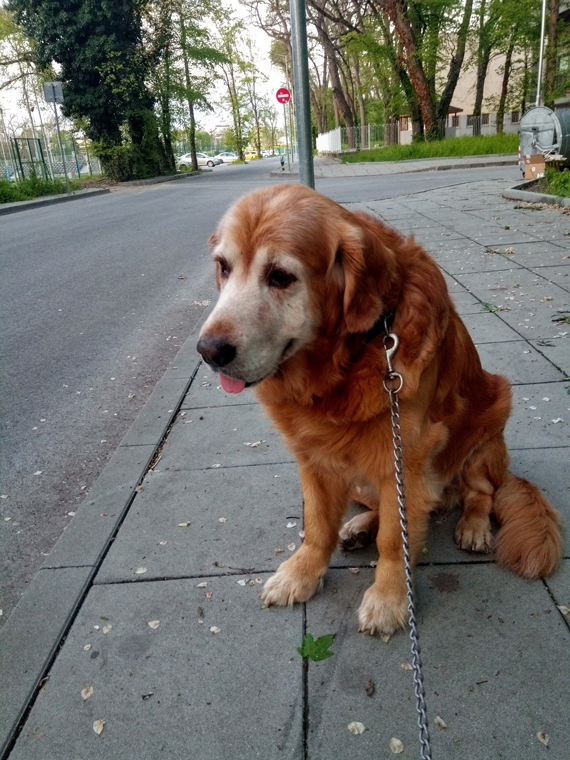
On the left, we have a photo of Ahil that I’ve taken with my phone. On the right is the result of the 3D inpainting that you’re going to learn how to do.
Making 3D photos
Inpainting refers to the process of recovering parts of images and videos that were lost or purposefully removed.
The paper 3D Photography using Context-aware Layered Depth Inpainting introduces a method to convert 2D photos into 3D using inpainting techniques.
The full source code of the project is available on GitHub. Let’s clone the repo and download some pre-trained models:
1%cd /content/2!git clone https://github.com/vt-vl-lab/3d-photo-inpainting.git3%cd 3d-photo-inpainting4!git checkout e804c1cb2fd695be50946db2f1eb17134f6d1b385!sh download.shLet’s clear up the demo files, provided by the project, and download our own content:
1!rm depth/*2!rm image/*3!rm video/*45!gdown --id 1b4MjYo_D5sps8F6JmYnomandLyQhjo6Z -O config.yml6!gdown --id 1TYmKRP4387hjDMFfWaeqcOVY7do-m0LE -O image/castle.jpg7!gdown --id 1VDT5YhANPJczevyhTdasJO5Zexl2l_fd -O image/dog.jpgThe images you want to convert into 3D photos need to go into the image directory. For our example, I am adding 2 from my personal collection.
We’re going to use (mostly) the default config and make sure that offscreen rendering is disabled:
1depth_edge_model_ckpt: checkpoints/edge-model.pth2depth_feat_model_ckpt: checkpoints/depth-model.pth3rgb_feat_model_ckpt: checkpoints/color-model.pth4MiDaS_model_ckpt: MiDaS/model.pt5fps: 406num_frames: 2407x_shift_range: [0.00, 0.00, -0.02, -0.02]8y_shift_range: [0.00, 0.00, -0.02, -0.00]9z_shift_range: [-0.05, -0.05, -0.07, -0.07]10traj_types: ["double-straight-line", "double-straight-line", "circle", "circle"]11video_postfix: ["dolly-zoom-in", "zoom-in", "circle", "swing"]12specific: ""13longer_side_len: 96014src_folder: image15depth_folder: depth16mesh_folder: mesh17video_folder: video18load_ply: False19save_ply: True20inference_video: True21gpu_ids: 022offscreen_rendering: False23img_format: ".jpg"24depth_format: ".npy"25require_midas: True26depth_threshold: 0.0427ext_edge_threshold: 0.00228sparse_iter: 529filter_size: [7, 7, 5, 5, 5]30sigma_s: 4.031sigma_r: 0.532redundant_number: 1233background_thickness: 7034context_thickness: 14035background_thickness_2: 7036context_thickness_2: 7037discount_factor: 1.0038log_depth: True39largest_size: 51240depth_edge_dilate: 1041depth_edge_dilate_2: 542extrapolate_border: True43extrapolation_thickness: 6044repeat_inpaint_edge: True45crop_border: [0.03, 0.03, 0.05, 0.03]46anti_flickering: TrueTo start the inpainting process, we need to execute the main.py file and pass the config:
1!python main.py --config config.ymlThis might take some time, depending on the GPU that you have.
Estimated depth
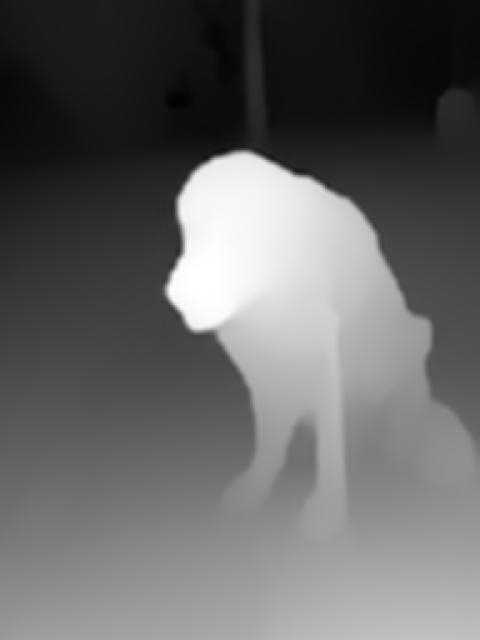
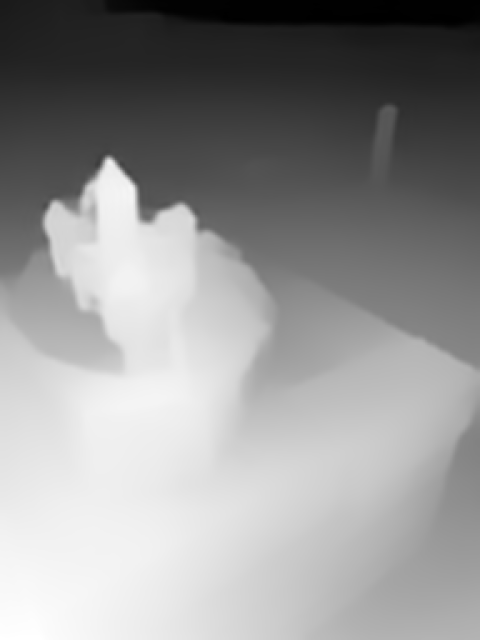
I’ve promised you that we’re going to look at the estimated depth later. The time has come, let’s look at some depth estimations:
1show_depth_estimation('image/dog.jpg', 'depth/dog.png')
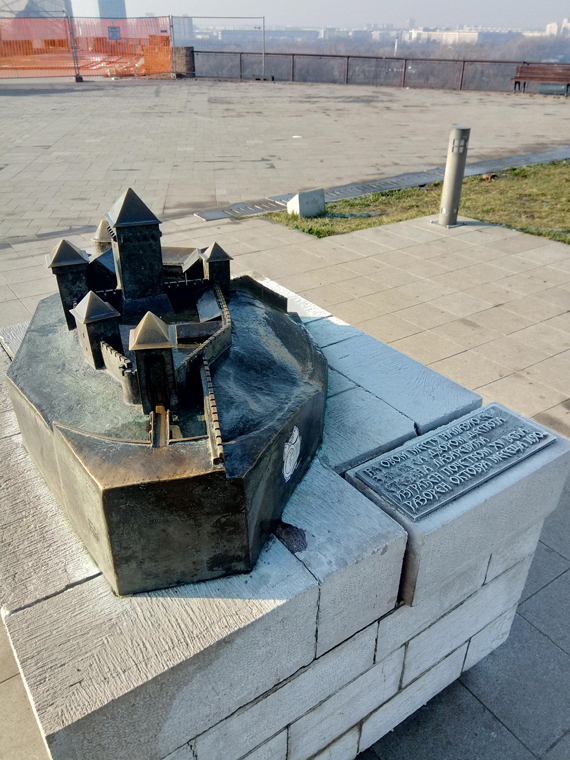
1show_depth_estimation('image/castle.jpg', 'depth/castle.png')
Lighter pixels represent shorter distance, relative to the camera. I would say that it’s doing a great job!
Results
Here are the 3D inpainting of the two images:
1show_inpainting('image/dog.jpg', 'video/dog_swing.mp4')Original image

3D photo
1show_inpainting('image/castle.jpg', 'video/castle_circle.mp4')Original image

3D photo
Amazing, right?
How does it work?
Here is a high level overview:
- Get the depth of each pixel (how far back is from the camera)
- RGB-D image from a dual-camera device (phone)
or
- Depth estimation with MiDaS: https://github.com/intel-isl/MiDaS
- Create LDI (layered depth image) representation
- Detect regions with a high depth difference (context/synthesis regions)
- Cut out those regions (this roughly resembles cutting out objects from the image)
- Generate the background behind the cut off objects
- Merge the background and cut out objects into a new LDI
The process is a lot more involved (including heavy image preprocessing), but you need to read the paper/code to get into the details.
What was the training data?
The authors didn’t create a special dataset for their task. They generate data.
First, the depth of images from the MSCOCO dataset is estimated using a pre-trained MegaDepth model. Then context/synthesis regions are extracted. A random sample of regions is merged with a set of images from the MSCOCO dataset. Thus, you get the ground truth of the backgrounds.
Conclusion
You can now convert any image into a 3D photo! Pretty amazing, right?
Here’s what you’ve went over:
- Install the prerequisites for the 3D photo inpainting project
- Look at a demo
- Convert some images into 3D photos
- Dive deeper into how it works
- Look into what training data was used
Go on, try it on your own photos and show me the results in the comments!
References
Share
Want to be a Machine Learning expert?
You'll never get spam from me